
3D aligner treatment viewer
How to Choose a 3D Aligner Treatment Viewer for Your Lab
A practical checklist for choosing a 3D aligner treatment viewer: browser support, staged treatment animation, IPR, attachments, views and mobile performance.
· 5 min read · DentoSim
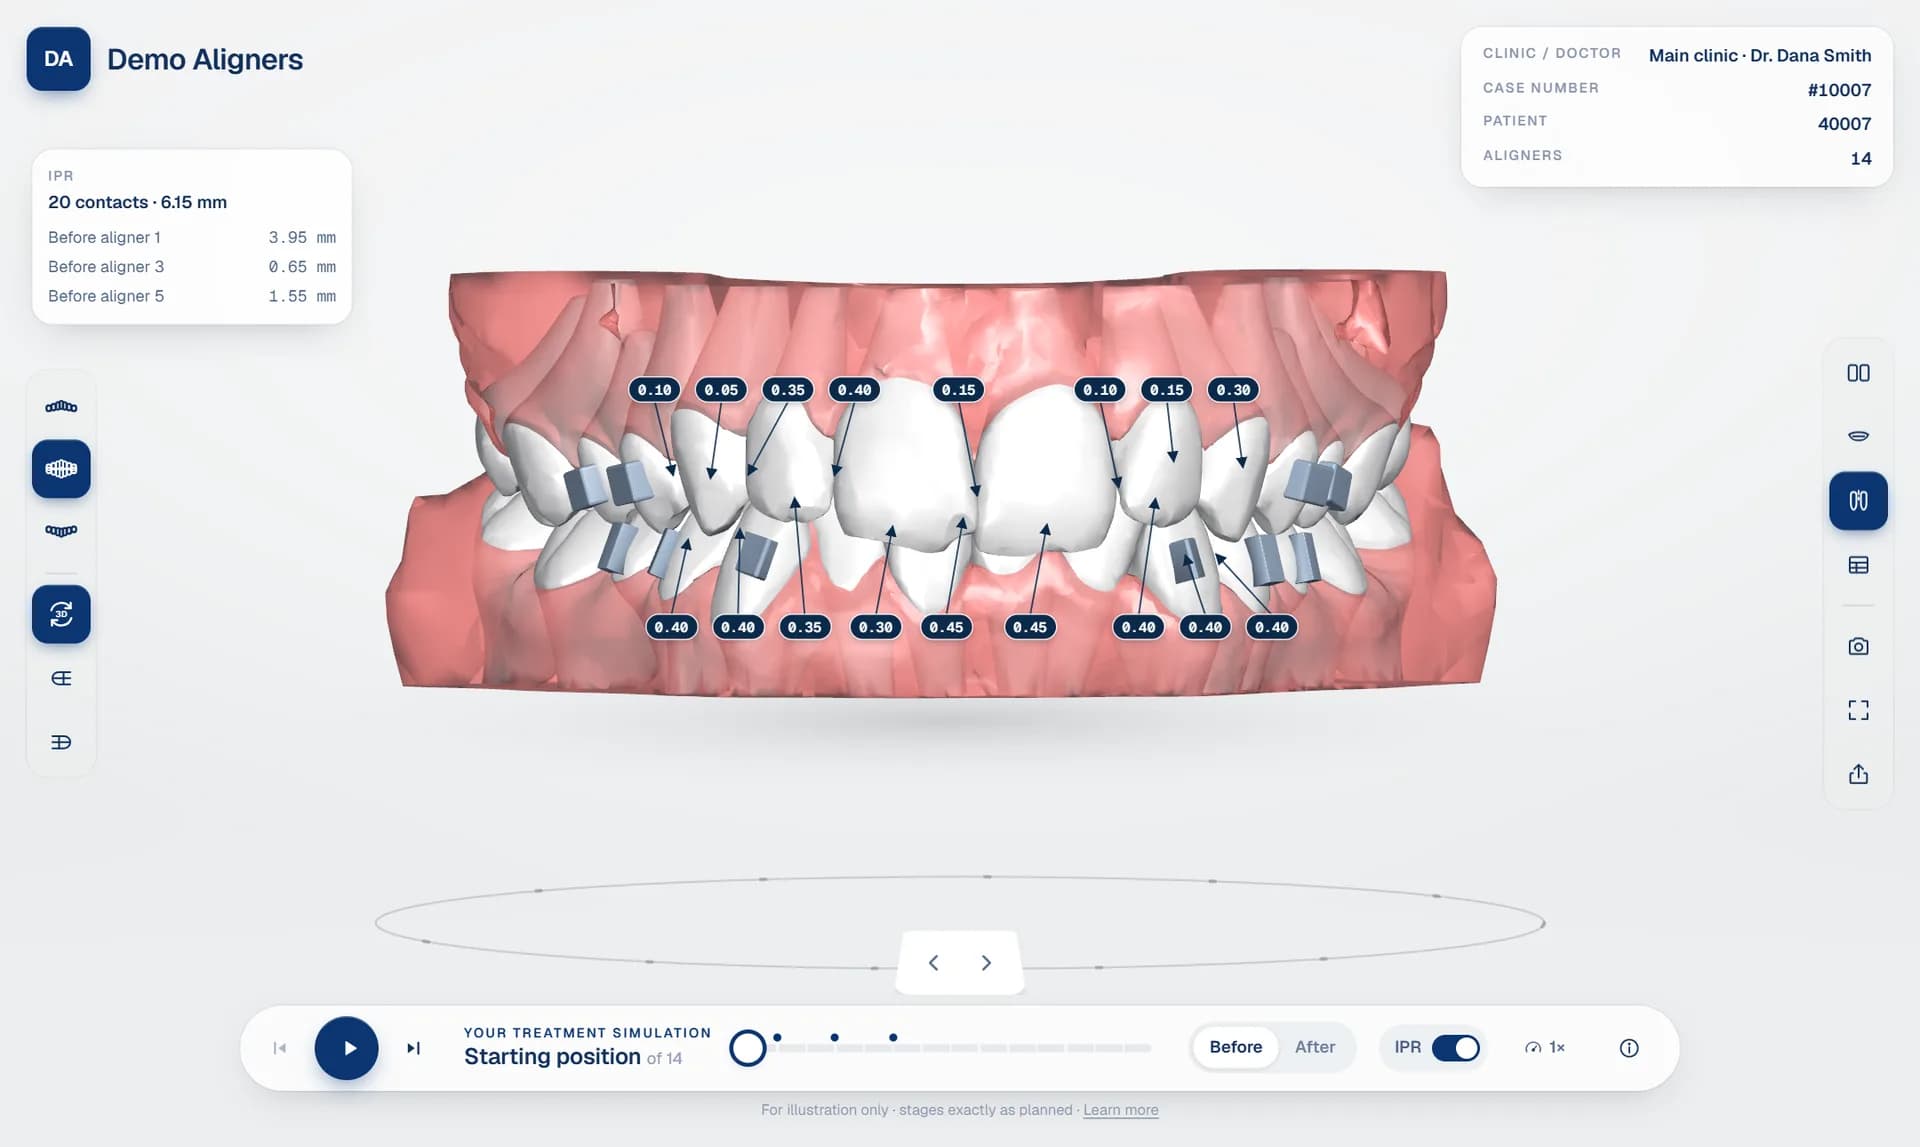
The 3D viewer is the part of your workflow that doctors and patients actually see. Everything else (uploads, processing, case management) happens behind the scenes. The viewer is where a well-designed treatment plan either looks clear, accurate and convincing, or confusing and unfinished.
That makes choosing a 3D aligner treatment viewer one of the most important decisions an aligner lab makes about its software. This guide is a practical checklist. Use it when you compare options, and test each point on your own cases rather than on a demo file.
1. It must run in the browser
A browser-based dental 3D viewer removes the biggest obstacle to adoption: installation. Doctors use a mix of Windows PCs, Macs, iPads and phones. Patients almost always open links on a phone, often directly from a WhatsApp message. If the viewer needs a download, a plugin, an account or a specific operating system, many people will simply never open it.
Check three things. Does the viewer open from a plain link on iPhone Safari and Android Chrome? Does it work without signing in, for patients? And does it load quickly on a mid-range phone over a mobile connection, not just on office Wi-Fi? A viewer that is beautiful on a workstation but takes a minute to load on a phone will lose patients before they see anything.
2. Smooth, staged treatment animation
Aligner treatment is a sequence. A staged aligner treatment animation should show the teeth gliding from one aligner to the next, so the viewer understands how each tooth gets to its final position. Many basic viewers simply swap one static model for the next. The result flickers and jumps, and it is hard to follow any single tooth.
Better viewers move each tooth as a rigid body between stages, rotating and translating it smoothly, while the gums reshape around the teeth. Attachments should move with the tooth they are bonded to. The difference is immediately visible: smooth playback looks professional and makes the plan easy to understand.
Look for these playback controls:
- play and pause, with a choice of speeds;
- step forward and back, one aligner at a time;
- a timeline you can drag to any aligner;
- one-tap jumps to the starting position and the final result;
- markers on the timeline for important events, such as the aligners where IPR is due.
3. The clinical details
For doctors, the viewer is a review tool. It must show the details they need to approve the plan with confidence:
- IPR values in millimetres at each contact, with the aligner each reduction should be done before, and a summary of the whole IPR protocol. See aligner IPR visualisation.
- Attachments shown on the teeth, in a distinct colour, with the option to hide them. See the aligner attachment viewer.
- The tooth movement table from the planning software, per tooth: rotation, angulation, inclination and translation. See the tooth movement table explained.
These details should come directly from the treatment plan's export. If someone has to retype IPR values or movements, mistakes will eventually happen.
4. The right views
Doctors want to inspect the plan from every side. A complete viewer offers:
- front, left, right and occlusal views, plus free rotation and zoom;
- upper arch only, lower arch only, or both;
- an open-mouth view, to see the occlusal surfaces of both arches at once;
- side-by-side start and result, and an overlay of start and current stage to see exactly what moved;
- the original intraoral scans, where they were provided, to check the plan against the patient's real teeth.
Patients need far fewer controls: play, before and after, and a few simple views of the bite. Too many buttons on the patient screen create confusion.
5. Different views for doctors and patients
The doctor's view and the patient's view have different jobs. The doctor's view should be a review tool, with approval, change requests and chat beside the 3D model. The patient's view should be simple, reassuring and branded with the practice's details.
The best approach is one viewer with two modes, built on the same 3D package. That keeps the plan consistent while giving each audience exactly what it needs. More on the patient side in before and after simulations for patients, and on the doctor side in the orthodontic treatment plan viewer.
6. Your brand, not the vendor's
If the viewer shows a software vendor's logo, every simulation you send advertises that vendor to your doctors and their patients. A white label aligner viewer carries your logo, your colours and your domain, so the simulation becomes part of your service.
7. Accuracy you can trust
A viewer is only useful if it shows the plan exactly as designed. Ask how the viewer handles units, coordinate systems and stage order, and whether it warns you when something in the export looks wrong. Where intraoral scans are available, check whether the starting position is registered to them and whether the fit is reported, so you know the bite on screen is the patient's real bite.
8. Sharing and security
The viewer link is how the plan reaches people, so it must be secure. Patient links should be long and unguessable, with an optional PIN and an expiry date, and you should be able to revoke them at any time. Doctor access should require a sign-in, ideally with two-factor authentication available. See how to share aligner treatment plans securely.
A quick test plan
When you trial a viewer, do this with one of your own cases:
- Upload the export exactly as it comes from your planning software.
- Open the doctor view on a laptop and check IPR, attachments and the movement table against the plan.
- Send yourself the patient link and open it on a phone over mobile data. Time how long it takes.
- Play the full treatment and watch one tooth. Is the movement smooth?
- Check whose logo and domain appear on each screen.
Try it on your own cases
DentoSim's 3D aligner treatment viewer covers every point on this list: it runs in the browser on any device, animates teeth and gums smoothly, shows IPR, attachments and the movement table, offers every view doctors expect, and carries your brand. The fastest way to judge any viewer is to upload one of your own treatment plans, so every lab gets free cases to start. Register your lab.
Frequently asked questions
Does a 3D aligner viewer work on phones?
A browser-based viewer does. It runs in Safari or Chrome on the phone, so patients can open it from a link without installing anything.
What file formats can a 3D aligner treatment viewer use?
It depends on the platform. DentoSim recognises exports from the top treatment planning software and also accepts staged STL, OBJ, PLY, 3MF and GLB files.
Why do some viewers flicker between stages?
They swap one static model for the next. Smoother viewers move each tooth between stages and reshape the gums, so the treatment plays as continuous movement.
Should patients see the same viewer as doctors?
They should see the same plan, but with a simpler set of controls. Doctors need review tools; patients need play, before and after, and a few views.
See it on your own treatment plans
DentoSim turns aligner treatment plans into 3D simulations for doctors and patients, under your lab's brand.